
Witam w Was pierwszym postem w nowym roku.
Welcome for the first time in 2013.
Po skończeniu rzeźbienia, całe podstawki pomalowałem na czarno i zacząłem od malowania ziemi. Jako kolor podstawowy użyłem scorched brown. Przy okazji postanowiłem pomalować tym kolorem także korzenie.
When sculpting is finished, I cover whole bases with chaos black and start painting from earth. My basic earth colour is scorched brown. It is also basic colour for roots, so I paint them at the same time.
1

Następnie wykonałem drybrush graveyard earth.
Next I make graveyard earth drybrush .
2

Na koniec malowania ziemi wykonałem ponownie drybrush tym razem bleached bone.
At the end of painting earth i make drybrush again but this time bleached bone.
3

Następnie zabrałem się za malowanie kamieni. Jako bazę nałożyłem mieszankę dheneb stone i chaos black.
Next, I paint stones. Basic stone colour is mixed dheneb stone and chaos black.
4

Rozjaśniałem mieszankę dheneb stone + chaos black poprzez dodawanie do niej więcej dheneb stone, aż uzyskałem efekt jak na zdjęciu nr 5 (ok 4 warstw). Podczas malowania kamieni starałem się mieć mocno rozwodnioną farbę (deneb stone ma bardzo dużo pigmentu).
I brightened stone adding more dheneb stone to mix of colours (dheneb stone + chaos black). To get effect as shown on 5th picture, I put approx. 4 layers. During painting I try to use diluted paint (dheneb stone have a lot of pigment)
5

Na koniec wykonałem drybrush czystym dheneb stone.
At the end I made drybrush with pure dheneb stone.
6

Teraz przyszła pora wrócić do korzeni. Najpierw poprawiłem je scorhed brown, następnie delikatnie użyłem drybrush bestial brown. Ostateczna warstwa to marron verde z palety valleyo (bardzo delikatny drybrush).
Now, let's go back to roots. First, I painted them again with scorched brown and gently apply bestial brown drybrush . The last layer is vallejo's marron verde (very gentle drybrush).
7

Po skończeniu malowania korzeni przyszła kolej na malowanie roślinności. Przeważnie używałem 3 warstw farby. Na 2 roślinach użyłem także wash (bardzo mocno rozwodniona farba).
After finishing roots it's time for painting plants. Usually I use 3 layers of paint. Also, I use wash to paint 2 plants. (wash = strongly diluted paint).
8

Na zdjęciu nr 9 zamieściłem schemat kolorów, których użyłem do pomalowania roślinności.
Przed tym krokiem zrobiłem mech na kamieniach (jak zrobić mech pokażę w kolejnym tutorialu.)
On the picture 9th I present colour scheme for my plants. Before painting plants I make moss on stones (how to make moss I will show you in next tutorial)
9

Jako wzór kolorystyczny dla moich węży wybrałem 2 prawdziwie istniejące gatunki:
For theme colour for my snakes I use two real species.
10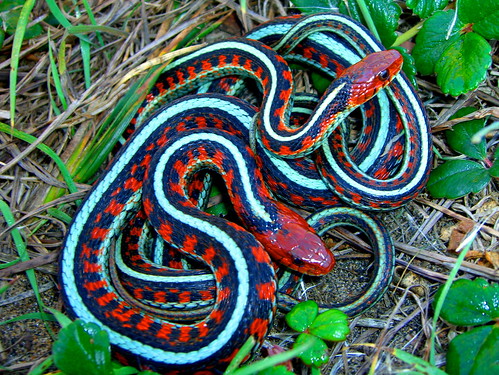

Węża po lewej stronie zacząłem malować od zrobienia linii hawk turquoise wzdłuż grzbietu oraz pomalowania głowy i plam po bokach ciała kolorem scrub red. Następnie rozjaśniłem niebieski warstwą azul profundo (vallejo). Scrub red rozjaśniłem przy pomocy blood red oraz warstwą mieszanki blood red i skull white.
Wężowi po stronie prawej nałożyłem w formie pasków scrub red (dalej z tym kolorem postąpiłem jak u węża po lewej stronie), snakebite leather, który rozjaśniłem skull white, na koniec do chaos black dodałem skull white i rozjasniłem czarny kolor.
I start painting snake (the one on the left side) from making hafk turquoise line, colouring head and making spots with scrub red. Next, I brightened blue color with vallejo's azul profundo layer. I brighten head and spots with blood red and I add 3rd layer of blood red + skull white.
I make horizontal stripes on the other one snake with scrub red (scrub red and snakebite leather - same mixing as before). I brightened snakebite leather with skull white and I put three layers of my highlits. At the end I make last few higlights on the black stripes with chaos black and skull white.
11

Na zdjęciu 12 moja miseczka ze skarbami z lasu. Mchu użyłem do dodania roślinności na podstawkach.
On the 12th picture I present you my treasures from forest. I use moss to put more flora on bases.
12

Przyklejam mchy na podstawkę klejem typu wikol. Na zdjęciu 13 widać także wodę (jak ją zrobić pokażę innym razem).
I glue moss to bases using wikol (glue for wood). On this picture you can also see water (I will show you next time how to make it ).
13

Na zdjęciu 14 widać, że nałożyłem na podstawkę więcej wikolu, do którego przykleję trawkę elektrostatyczną.
On the 14th picture you can see that I put on the base more wood glue (wikol) in places where I want to glue static grass.
14

Zdjęcie 15 przedstawia efekt pracy na tym etapie, ale to jeszcze nie koniec.
Picture 15th presents current effect, but this is not the end yet.
15

Maluję boki podstawek kolorem Marron Verde (Vallejo) - najbliższy temu kolorwi z palety GW jest Graveyard earth.
I painted bases' sides with Vallejo's Marron Verde - the most simmilar colour from GW is Graveyard earth.
16

Koniec! Przedstawiam efekt końcowy.
Finished! I present you final result.
17

I hope you've enjoyed my first tutorial :D
No comments:
Post a Comment